Eggless Cake pops and Marshmallow bouquet
The story of little cake pops - PART 1 : Sticky Likes
I have this habit of sticking to things. Really I do!
When I like something, I get an instant urge to recreate it. When I see pretty cards in Archies I want to make them (my friends get those for bdays) , when I eat tasty food, I try them at home (cant say about the success rate) and when it comes to desserts...there is no looking back. And this is how I stick to things unless I achieve it.
And that habit has led to → crafting → baking → kitchen experiments and stories → blog → and now to these CAKE POPS. (My habit isn't that bad.. now I feel)
I have had cake pops a couple of times before and I'm smitten by those soft, small, single serving balls that comes in flavours you can only imagine. Plus they look so cute and colourful. (Yes that line was absolutely girly. I know)
The story of little cake pops - PART 2 : Anniversary gift order

It was my friend's parents' anniversary. He didn't want to cut a cake. He wanted something different. And then enters cake pop bouquet. It was as they wanted - different, unique, and very tasty. An edible bouquet..who says no to that! And that's how I got my first order and I passed with flying colours. Hurray!! They loved it literally.. and personally thanked me ☺
And the story doesnt end here..I had saved a few cake pops for me..(of-course I had to.I couldn't resist..I keep backups for myself) and they are heavenly. I had one and couldn't stop at it. (Explaining my never ending dessert craving. Why do u think I was mesmerized at the dessert fair 2)
So we start off with our recipe details. Very easy to make and the most important thing..it is so much fun..seriously. I enjoyed making them (as much as eating them..and seeing others happy eating) Even the recipe is in 3 PARTS!
PART 1- MAKING THE CAKE
First we make our cake..simple as we always do. Any sponge cake you like will work. Any flavour any style because ultimately you are going to crush them to pieces. (Yeah it was difficult for me to do this to my perfectly baked cake..*tears*..but all for a good cause)
I made this eggless sponge cake inspired by The Veg Recipes of India.
I twerked the recipe a bit for a different flavour.
Take 1.5 cup flour + 1 tsp baking powder + a pinch of salt.+ 1 tsp cocoa powder
In another bowl mix together ½ cup white butter + 3/4 cup sugar.
In another small bowl froth 3 tbsp yogurt + 1 tbsp water + ½tsp baking soda and 1 tbsp white vinegar. (Its going to rise so you have to be fast)
Add the sugar mix to yogurt mix. Now add the dry ingredients to this and fold. Add vanilla essence. Do not over fold or it will start weighing down.

Preheat the oven @ 180ºC. Grease the baking tin with parchment paper and pour the batter into it. Bake the cake for 30-35 min. Do the fork test. Pull out the cake and keep it for cooling.
PART 2 - MAKING CAKE POP
Once the cake cools, grind it into a powder. You can use your hands but it wont be as fine as the food processor one.
Now add some frosting or icing to it. I generally make this with 1.5 cup icing sugar + 1 tbsp milk + 1 tbsp essence (I used butterscotch) + 1/2 cup butter(adding more if required)
Alternatively you can also add whipped cream.
Make a dough out of this. Now scoop out an ice cream scoop sized batter and make round balls of cake dough. I made 10-12 balls.Put in the fridge for 10 min.
Now insert the plastic straws /paper straws or lollipop sticks(dipped in white chocolate) into the dough balls and put it inside the fridge for about 1.5 hours.

PART 3 - COATING THE POPS
Melt the white chocolate for dipping these cake pops.
I used Nestle Milky Bar chocolate (Used to be my fav when I was a kid).
CAUTION: I had to tell you this. It is embarrassing and sad for me but it has to be shared. Never ever try to heat chocolate in a microwave thinking it to be a shortcut. It will burn. Badly. Do NOT do this.
Chocolate has to be melted in a double boiler..where in the water is boiled in the saucepan below and the chocolate melts with its heat in a pan above.

Now most of us do not have a double boiler at home. What to do? Very simple. Boil some water in a in a saucepan. Now take a bowl (preferably steel) and put the chocolate pieces in it. Place this bowl in the boiling water and the you will see the chocolate melting.

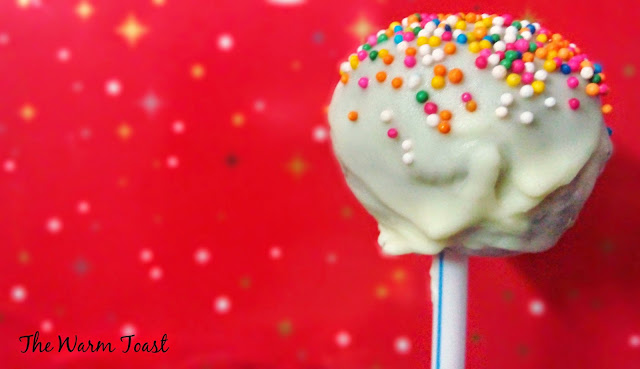
Now dip your cake pop in the melted chocolate and twirl so that excess chocolate falls off. Sprinkle some sugar balls or confetti or any decoration of your choice.
NOTE: It will harden really fast because the cake pop are just out of the fridge.
Keep this in a stand which i made with a Styrofoam sheet and a plastic container and refrigerate it. (Its 44°C outside. You cant even think of leaving those pretty pops out)

And so your white chocolate covered yummy pops are ready.
Mine was converted into a bouquet with heart shaped marshmallows as an anniversary order. And they loved it. And I'm happy when people are happy with what I make.

The recipe is here in short for you to follow. Its a long process but definitely one where you will enjoy a lot. Do give it a try..you will love these.
White chocolate.
Nestle Milky Bar 7 packets of 26gm
Sprinklers of your choice
METHOD
For Cake
1) Mix flour, baking powder and salt.
2) In another bowl mix butter and sugar.
3) In another bowl take yogurt and add baking soda and vinegar. It will start frothing so you have to be fast.
4) Add this frothing mixture to the sugar butter mix and add water.
5) Now add the dry ingredients slowly and fold until properly mixed. Do not over fold.
3) Mix well and make a dough out of it.
4) Scoop out ice cream scoop sized dough and make it into balls.
5) Keep these balls in the fridge for 15-20 min for setting.
Coating White Chocolate
1) Melt white chocolate in a double boiler.
Alternative: Boil some water in a bowl. Put the pieces of chocolate in another smaller steel bowl. Place this bowl of chocolate in the boiling water to melt the chocolate.
2) Take the straws or sticks and dip one end in the melted white chocolate. Now insert this end into the cake sough balls, Keep it back in fridge for 1-2 hour.
3) Take the cake pops out and dip them in the liquid chocolate for coating. Let the excess chocolate drizzle down.
4) Simultaneously put some sprinklers of your choice on it. The coating will harden fast because of the chilled pops.
5) Keep it in a stand made by punching holes in thermacol or styrofoam sheet in a container and keep it inside the fridge.
Cake pops are ready. You can gift this for occasions like birthdays or anniversary.(only if you succeed in saving them before eating lol) They are unique and pretty and I'm sure that its going to be loved by all.
Do try..and let me know how it turned out to be.
You can post your pictures on my facebook page or tag me on Instagram or Twitter.
Happy eating. ☻

I have this habit of sticking to things. Really I do!
When I like something, I get an instant urge to recreate it. When I see pretty cards in Archies I want to make them (my friends get those for bdays) , when I eat tasty food, I try them at home (cant say about the success rate) and when it comes to desserts...there is no looking back. And this is how I stick to things unless I achieve it.
And that habit has led to → crafting → baking → kitchen experiments and stories → blog → and now to these CAKE POPS. (My habit isn't that bad.. now I feel)
I have had cake pops a couple of times before and I'm smitten by those soft, small, single serving balls that comes in flavours you can only imagine. Plus they look so cute and colourful. (Yes that line was absolutely girly. I know)
The story of little cake pops - PART 2 : Anniversary gift order

It was my friend's parents' anniversary. He didn't want to cut a cake. He wanted something different. And then enters cake pop bouquet. It was as they wanted - different, unique, and very tasty. An edible bouquet..who says no to that! And that's how I got my first order and I passed with flying colours. Hurray!! They loved it literally.. and personally thanked me ☺
And the story doesnt end here..I had saved a few cake pops for me..(of-course I had to.I couldn't resist..I keep backups for myself) and they are heavenly. I had one and couldn't stop at it. (Explaining my never ending dessert craving. Why do u think I was mesmerized at the dessert fair 2)
 |
| Strawberry Vanilla Heart Marshmallows on sticks for bouquet. |
So we start off with our recipe details. Very easy to make and the most important thing..it is so much fun..seriously. I enjoyed making them (as much as eating them..and seeing others happy eating) Even the recipe is in 3 PARTS!
PART 1- MAKING THE CAKE
First we make our cake..simple as we always do. Any sponge cake you like will work. Any flavour any style because ultimately you are going to crush them to pieces. (Yeah it was difficult for me to do this to my perfectly baked cake..*tears*..but all for a good cause)
I made this eggless sponge cake inspired by The Veg Recipes of India.
I twerked the recipe a bit for a different flavour.
Take 1.5 cup flour + 1 tsp baking powder + a pinch of salt.+ 1 tsp cocoa powder
In another bowl mix together ½ cup white butter + 3/4 cup sugar.
In another small bowl froth 3 tbsp yogurt + 1 tbsp water + ½tsp baking soda and 1 tbsp white vinegar. (Its going to rise so you have to be fast)
Add the sugar mix to yogurt mix. Now add the dry ingredients to this and fold. Add vanilla essence. Do not over fold or it will start weighing down.

Preheat the oven @ 180ºC. Grease the baking tin with parchment paper and pour the batter into it. Bake the cake for 30-35 min. Do the fork test. Pull out the cake and keep it for cooling.
PART 2 - MAKING CAKE POP
Once the cake cools, grind it into a powder. You can use your hands but it wont be as fine as the food processor one.
Now add some frosting or icing to it. I generally make this with 1.5 cup icing sugar + 1 tbsp milk + 1 tbsp essence (I used butterscotch) + 1/2 cup butter(adding more if required)
Alternatively you can also add whipped cream.
Make a dough out of this. Now scoop out an ice cream scoop sized batter and make round balls of cake dough. I made 10-12 balls.Put in the fridge for 10 min.
Now insert the plastic straws /paper straws or lollipop sticks(dipped in white chocolate) into the dough balls and put it inside the fridge for about 1.5 hours.

PART 3 - COATING THE POPS
Melt the white chocolate for dipping these cake pops.
I used Nestle Milky Bar chocolate (Used to be my fav when I was a kid).
CAUTION: I had to tell you this. It is embarrassing and sad for me but it has to be shared. Never ever try to heat chocolate in a microwave thinking it to be a shortcut. It will burn. Badly. Do NOT do this.
Chocolate has to be melted in a double boiler..where in the water is boiled in the saucepan below and the chocolate melts with its heat in a pan above.

Now most of us do not have a double boiler at home. What to do? Very simple. Boil some water in a in a saucepan. Now take a bowl (preferably steel) and put the chocolate pieces in it. Place this bowl in the boiling water and the you will see the chocolate melting.

Now dip your cake pop in the melted chocolate and twirl so that excess chocolate falls off. Sprinkle some sugar balls or confetti or any decoration of your choice.
NOTE: It will harden really fast because the cake pop are just out of the fridge.
Keep this in a stand which i made with a Styrofoam sheet and a plastic container and refrigerate it. (Its 44°C outside. You cant even think of leaving those pretty pops out)

And so your white chocolate covered yummy pops are ready.
Mine was converted into a bouquet with heart shaped marshmallows as an anniversary order. And they loved it. And I'm happy when people are happy with what I make.

The recipe is here in short for you to follow. Its a long process but definitely one where you will enjoy a lot. Do give it a try..you will love these.
EGGLESS WHITE CHOCOLATE CAKE POPS
INGREDIENTS
For Cake
All Purpose flour (maida) 1.5 cup
Baking powder 1 tsp
Salt a pinch
Sugar 3/4 cup
White butter 1/2 cup (melted)
Yogurt 3 tbsp + 1 tbsp water
Baking soda 1/2 tsp
Vinegar 1 tbsp
Water 1 cup
Vanilla Essence 1 tsp
For Cake Pop
Frosting/ Icing of your choice of flavour.
For butterscotch icing (optional)
White Butter 1/2 cup
Icing Sugar 1.5 cup
Milk 2 tbsp
Butterscotch Essence 1 tbsp
Lollipop sticks or plastic straws.
Stand made with thermacol or styrofoam sheet in a container
For Coating
White chocolate.
Nestle Milky Bar 7 packets of 26gm
Sprinklers of your choice
METHOD
For Cake
1) Mix flour, baking powder and salt.
2) In another bowl mix butter and sugar.
3) In another bowl take yogurt and add baking soda and vinegar. It will start frothing so you have to be fast.
4) Add this frothing mixture to the sugar butter mix and add water.
5) Now add the dry ingredients slowly and fold until properly mixed. Do not over fold.
6) Preheat the oven at 180°C.
7) Grease the baking tin with parchment paper or cooking oil.
8) Pour the batter into the tin and bake for 30-35 min. Do the fork test. Once baked keep the cake out for cooling.
For Butterscotch Frosting/ Icing (optional)
1)Take the butter and sugar and mix well.
2)Now add the milk and butterscotch essence and whip well until you get soft peaks to make icing.
For Cake Pops
1) Once the cake is cooled break it into small pieces. Put these pieces into the food processor to get a coarse powder.
2) Add the frosting (method above) or whipped cream to this ground cake powder.7) Grease the baking tin with parchment paper or cooking oil.
8) Pour the batter into the tin and bake for 30-35 min. Do the fork test. Once baked keep the cake out for cooling.
For Butterscotch Frosting/ Icing (optional)
1)Take the butter and sugar and mix well.
2)Now add the milk and butterscotch essence and whip well until you get soft peaks to make icing.
For Cake Pops
1) Once the cake is cooled break it into small pieces. Put these pieces into the food processor to get a coarse powder.
3) Mix well and make a dough out of it.
4) Scoop out ice cream scoop sized dough and make it into balls.
5) Keep these balls in the fridge for 15-20 min for setting.
Coating White Chocolate
1) Melt white chocolate in a double boiler.
Alternative: Boil some water in a bowl. Put the pieces of chocolate in another smaller steel bowl. Place this bowl of chocolate in the boiling water to melt the chocolate.
2) Take the straws or sticks and dip one end in the melted white chocolate. Now insert this end into the cake sough balls, Keep it back in fridge for 1-2 hour.
3) Take the cake pops out and dip them in the liquid chocolate for coating. Let the excess chocolate drizzle down.
4) Simultaneously put some sprinklers of your choice on it. The coating will harden fast because of the chilled pops.
5) Keep it in a stand made by punching holes in thermacol or styrofoam sheet in a container and keep it inside the fridge.
Cake pops are ready. You can gift this for occasions like birthdays or anniversary.(only if you succeed in saving them before eating lol) They are unique and pretty and I'm sure that its going to be loved by all.
Do try..and let me know how it turned out to be.
You can post your pictures on my facebook page or tag me on Instagram or Twitter.
Happy eating. ☻
Comments
Post a Comment